Saturday, December 31, 2011

2011 Gallery

My first year of craft blogging was fun and productive.  To cap off 2011, I've created this gallery, which displays my top twelve projects (four layouts, four cards, four off-the-page projects) from the past year.  To learn more about a particular project, click the link below its picture.


 I reflected on the prior year in a 12x12" layout called "2010".


I looked on the bright side of long, snowy Minnesota winters with this friendship card.


I recorded important moments in my husband's life on a 12x12" layout called "His Soundtrack".


I made a "steampunk"-style anniversary card for my husband.


I decorated the jar that holds my teaching supplies.  (That's right, when I'm not busy parenting, doing housework, and crafting, I give Russian language lessons.)


I used lady bug imagery to create a little girl card.


I looked back at my earlier years of parenthood to create a two-page, 8.5x11" layout called "How to Feed a Baby".


I incorporated a ginger ale cap into a hanging Father's Day card.


I designed some cute wall art  for my son's room.


I celebrated the beauty of autumn with a 12x12" layout called "October on the Farm".  (This is my favorite layout that I created this year.)


I finished out the year by creating lots of personalized Christmas ornaments.


And I looked to the future with this altered pocket calendar.

Thanks for looking at my 2011 gallery!

Thursday, December 29, 2011

SIL: Baby's First Christmas

Supplies: cardstock (Wausau Paper), patterned paper (October Afternoon), glitter (Stickles by Ranger), alphabet stickers (October Afternoon), button (Blumenthal Lansing), thread (DMC), rubber bear charm (October Afternoon), notebook paper (Earthbound), repurposed items (baby mitten, ribbon, plastic heart charm).

Recently I blogged about making a mitten into a gift holder.  Well, in the above layout, I've used a mitten again.  This time I've used a mateless baby mitten as a page pocket to hold my journaling.  Of course, it also doubles as a page accent.

* preparing to stick the mitten to the page *

It's always a challenge to get textiles to stick to paper.  In the case of this mitten, though, it was easy.  I sewed scraps of paper to the back of the mitten, then put adhesive (both glue dots and adhesive squares) on those scraps.  That way, I was adhering paper to paper when I stuck the mitten to my layout.  The mitten is well bonded to the page--it's not coming off!

This layout is for the December Scrap-It-Lah challenge.  The challenge was to make a multi-photo, holiday-related page incorporating glitter, the color red, the color green, the color gold, and one more color of your choice (I chose brown).

Sadly, this is the last Scrap-It-Lah challenge.  I wish all the Scrap-It-Lah members the best of luck as they move on to new projects!  I only discovered Scrap-It-Lah a few months ago, and I am interested in going back and trying some of the challenges that I've missed, just for fun.  So far I've completed one of the old challenges, and I'll leave you today with that layout.  Below you will find "Dorothy from Kansas," which I created using the ideas from the October challenge.  Thanks for all the inspiration, Scrap-It-Lah!

Supplies: cardstock (Wausau Paper), Wizard of Oz fussy-cut papers (Graphic 45), all other papers (Echo Park), sentiment sticker (Lily Bee Design), alphabet stickers (Echo Park), banner stickers (Lily Bee Design), button (Layl McDill), journaling cards (Echo Park), thread (DMC), pen (Zig), book paper (old copy of a Wizard of Oz book).

OUAS: The Joy of Cookies

Supplies: green paper (Cosmo Cricket), dotted paper (Basic Grey), white paper (Crate), journaling box (Bella Blvd), label sticker (Crate), alpha stickers (Basic Grey), mini alpha stickers (Simple Stories), shiny stickers (Walmart), pen (Zig).

Here is my contribution for the current challenge at Once Upon a ... Sketch.  This time around we were to write about what we do on December 25.  At first I was stumped about what to write, because our routine varies from year to year.  Sometimes we celebrate with my husband's parents, sometimes we celebrate with my parents, and sometimes we celebrate with other relatives.  After thinking about it for awhile, though, I realized that there is one constant in all of our celebrations.  No matter where we are, and no matter with whom we are spending the day, we ALWAYS have Christmas cookies!  Lots and lots of homemade Christmas cookies!!!  So, my journaling on this page reads: "Dear Santa, I don't care what we have for Christmas dinner.  But for dessert we MUST have lots of cookies!"

My interpretation of the sketch this time around was pretty literal.  I had to make some slight adjustments in order to accomodate three photos and a smaller page size, but the structure of my page is quite close to that of the original sketch.  The only major change I made was to use the "white space" in the original sketch as the location of my journaling.

Homemade cookies have become even more important to me in recent times, because my husband has become gluten intolerant.  Doctors are not sure why, but recently many people have become unable to eat gluten, which is in wheat, barley, rye, and some oats.  I feel sorry for my husband, who often has to miss out on treats, since most baked goods contain wheat.  So, I'm building up a repertoire of gluten free dessert recipes, and I want to share my favorite one with you.  Unlike many gluten free (GF) recipes, it does not taste like cardboard!  In fact, these were the most popular cookies at my family's Christmas party this year, and they disappeared in about five minutes.  :)

Caramel Squares: Preheat oven to 350 degrees Fahrenheit.  Combine 2 cups gluten free flour, 1 cup firmly packed brown sugar, and 1/2 cup butter.  Press this mixture onto the bottom of an ungreased 9x13" baking pan.  In a saucepan, stir together 1 cup of butter and 1 cup of brown sugar over medium heat.  Bring the mixture to a rapid boil for one minute, stirring constantly.  Pour mixture over crust and garnish as you wish.  (I used sliced almonds, but you could use sprinkles, chopped nuts, chocolate chips, etc.)  Bake for 15-20 minutes, until the entire caramel layer is bubbly.  Cut into squares while still warm.  (To convert recipe to European or other cooking units, see http://www.convert-me.com/en/convert/cooking.)

Many gluten free recipes contain strange-sounding, expensive ingredients, like xanthan gum and quinoa.  What I like about the above recipe is that it does not contain any of these tongue-twisting ingredients.  The only special ingredient you need is gluten free flour.  I like to buy Bob's Red Mill All Purpose GF Baking Flour--it's simple and tasty.

If you don't have any gluten intolerant people to bake for, you can still use this recipe.  Simply substitute regular baking flour for the GF flour; the amount stays the same.  The caramel squares are tasty both ways.  Bon appetit!

Friday, December 23, 2011

Just a Little Something: Ornaments & a Gift Set

We're getting down to the wire...it's almost Christmas!  My plans for the evening involve wrapping gifts.  But I thought I'd take a quick break from Christmas prep for the moment and share with you some little "stocking stuffers" that I've made recently.


Remember back in October, when I showed you how to make an ornament from a mateless baby sock?  Well, the ornament above is in the same vein; it's made from a mateless toddler mitten.  What is is about socks and mittens, anyway?  They are so easy to lose.

I doctored up this mitten up by sewing a button onto it.  I then covered the button with a fussy-cut circle from the Crate "Peppermint" paper line and adhered the circle to the button.  I covered the "candy" with a piece of cellophane (cut from product packaging) and twisted the cellophane to look like a candy wrapper.  A piece of old shoelace serves as an ornament hanger.  I filled the mitten with  Christmas candy, so it serves double duty as both an ornament and a gift holder.  It is part of the peppermint gift ensemble that you see in the photo below.  (You may remember the gift jar from another post.)  ETA: This peppermint gift set was published in the December, 2012, issue of Scrap n' Art e-zine. 


Ornaments can also serve double duty in a different way; they can serve as gift tags.  I made a rocket ship ornament (seen in the two photos below) for my husband Scott using pieces of the October Afternoon "Rocket Age" chipboard album.


The alpha-numeric stickers are also from OA, the alien stickers are from Bo Bunny, and the star stickers are from Reminisce.

Of course, I've still been making my juice lid ornaments.  They can also work as gift tags.  If you're not sick of seeing my juice lid ornaments by now, I'll end this post by sharing a cute one I recently created (photo below).  The star paper is from OA, the Santa sticker is from Reminisce, the mini alphas are from Crate, and the chipboard star is from DCWV.  Happy holidays!


Wednesday, December 14, 2011

Build a Tree

When I saw the current color palette at the Color Room, I thought it would work perfectly with the Gertie papers from My Mind's Eye's "Stella and Rose" collection.  My stash of Gertie papers has been well loved, and I only have scraps left.  But, since I'm into using up scraps, I decided to try to make a card anyway.  Since there is a card challenge up at the My Mind's Eye blog, I decided to combine it with the Color Room challenge.


The My Mind's Eye challenge is to create a card with a tall, vertical element in the center.  This is to be surrounded with three round elements.  (See the sketch here.)  For my interpretation of this card (see photo above), I decided to create a colorful, pieced Christmas tree, accented by three funky snowflakes.  Let me show you how I did it.


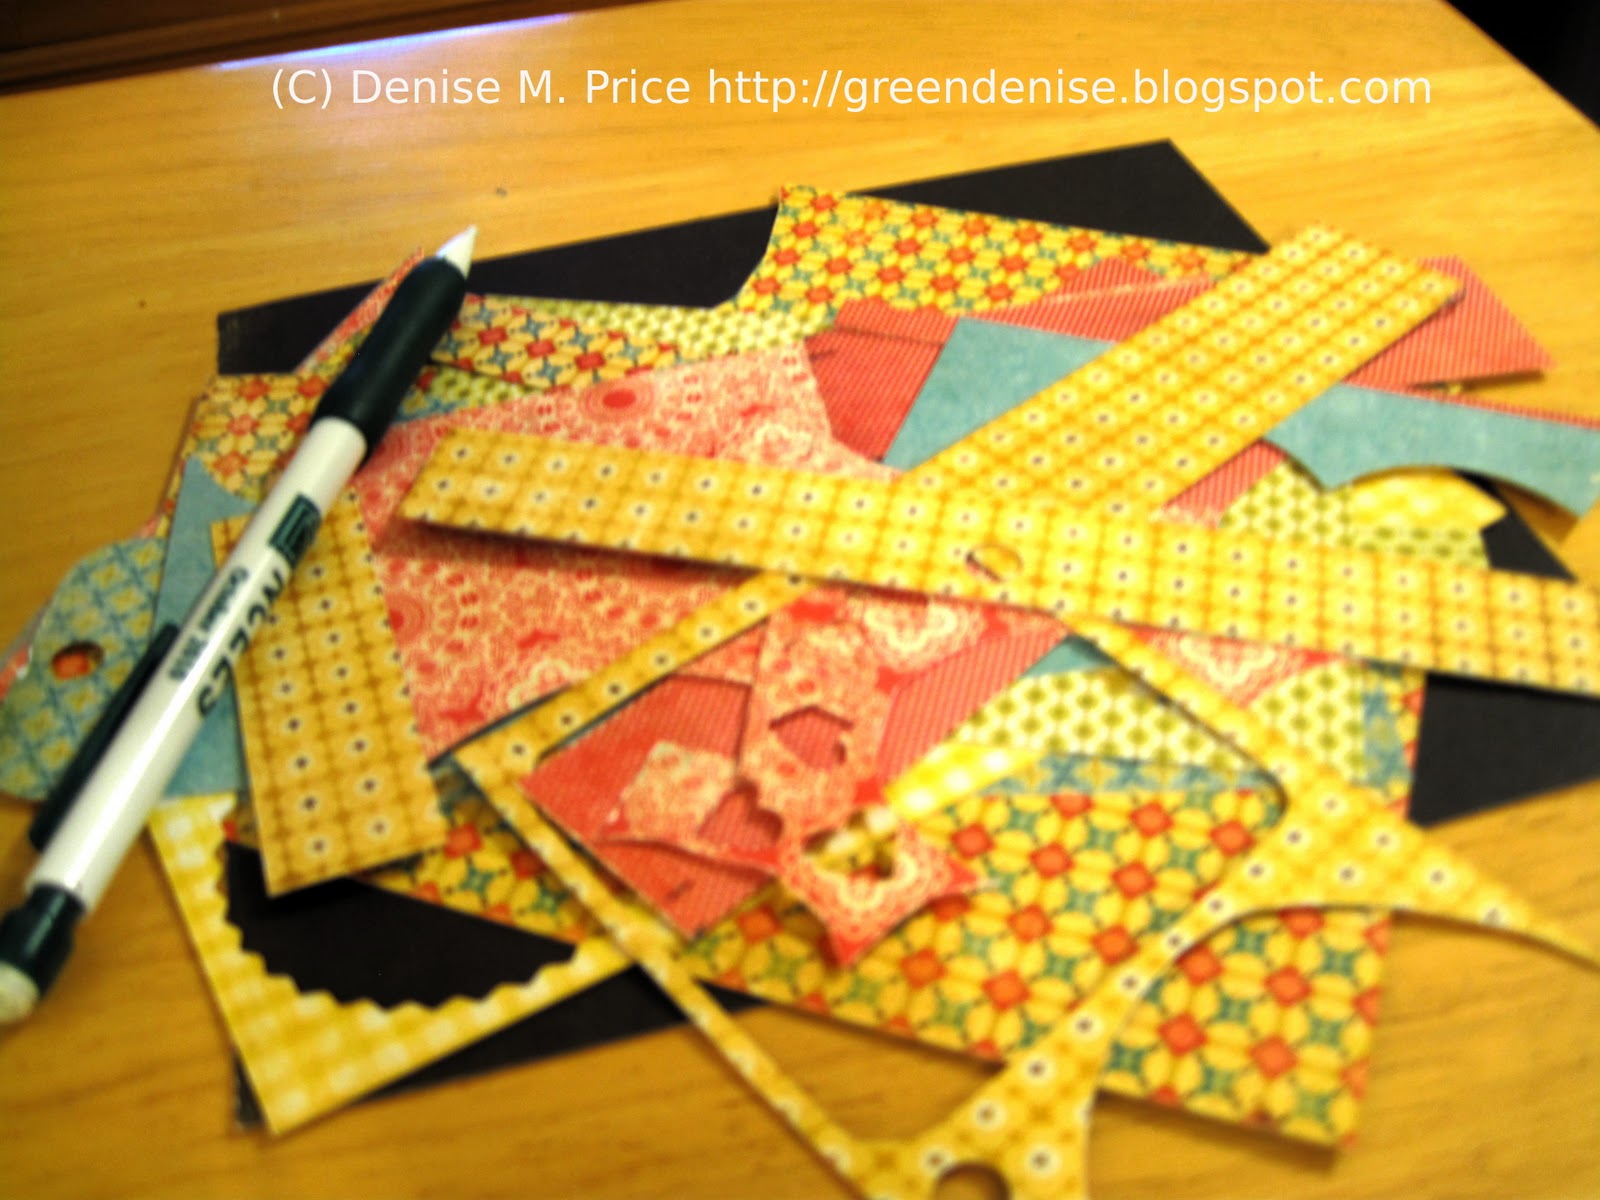
1.  First I gathered scraps from my pad of Gertie mini papers (6x6") that would work with the Color Room palette.  I ended up with eight different patterns.  I also chose a large chocolate-brown scrap (seen at the bottom of this pile) for a neutral background for my card.

2.  I trimmed my chocolate-brown paper to size, rounded its corners, then set it aside.

3.  I chose a piece of paper that did NOT coordinate with the palette, folded it in half, and cut out a triangle to use as the base for my Christmas tree.


4.  I punched strips of paper from my eight chosen patterns.  I used a border punch from EK Success (seen above) that I thought created the look of fluffy evergreen boughs.  It also created a lot of confetti!

5.  I decided on an order for my different colored strips, then began gluing them to my triangular base.  I started at the bottom of the triangle and worked my way up.  I made sure to only use a thin line of glue along the top (non-punched) of each strip.  The two photos below show this step of creating the tree.

*the first few strips are adhered at the bottom of the triangle*
*now the triangle is all covered with strips*

6.  After my triangle was completely covered with punched strips, I flipped it over to the other side (photo below)
.


7.  Then I used scissors to trim the excess paper (see photo above), leaving behind just the triangular tree.

8.  I fussy-cut three round snowflake shapes from the remaining scraps of one of my patterned papers.  I glued a my tree to the chocolate-brown base, added a strip of green paper for a tree trunk, and then glued the snowflakes in place.  The photo below shows one of these snowflakes.


9.  I accented each snowflake with gold gel pen doodles and a Petaloo rhinestone.  I also used the gold gel pen to add my quote and whimsical doodling to the chocolate-brown background.


10.  I fluffed up the layers of the Christmas tree (see photo above), using the eye of a blunt embroidery needle to gently curl the punched points outward.

11.  I adhered the chocolate brown panel to a pre-made card base, and my card was finished.  There it is again, in the photo below.  Hope you like it!


Tuesday, December 13, 2011

OAS + TCR = December Fun!

Supplies: all papers, stickers, flags, and buttons (October Afternoon); journaling lines template (Creative Memories); pens (Zig); rhinestone (Petaloo); repurposed items (snowflake tag and postage stamp).

The current sketch at Once Upon a ... Sketch and the current color palette at the Color Room seemed like a match made in heaven.  So, I combined them and came up with "Time Together," the layout you see above.


In keeping with the sketch, I kept my title (photo above) in the cluster in the upper left-hand corner of the layout.


Also in keeping with the sketch, my journaling (see photo above) is in the cluster in the lower right-hand corner of the layout.  I used a template to draw lines onto an October Afternoon flashcard, thereby turning it into a journaling card.  The journaling prompt this time around at Once Upon a ... Sketch is to write about what you most look forward to in December.  I wrote: "I look forward to December because A. has lots of time off from school.  We bake together, we decorate together, and we play together."


I diverged from the sketch by placing my photos in the "negative space" in the sketch, instead of in the title cluster.  Of course, I also added my own "green" touches to the layout by turning a snowflake-shaped gift tag and a used postage stamp into embellishments (see two photos above).

The photos on this layout are from last December.  I'm still waiting for the school holidays to start this year.  When they do, I'll be able to spend lots of time with my sweet boy.  Of course, we've already started celebrating together in small ways...by opening windows in the Advent calendar, by playing with the manger scene figures, etc.  But there is nothing like being able to spend days in a row together.  I'll be just as cheerful as the fussy-cut snowman (photo below) on this layout, once the school holidays begin.


Tuesday, December 6, 2011

Saint Nicholas Day

Not everyone in the USA celebrates Saint Nicholas Day, but I have a special affection for this holiday.  It's a day dedicated to the real person on whom the legend of Santa Claus is based.

In this spirit of this festive day, I'd like to share three holiday-related projects--a gift jar, a layout, and a card--with you today.


The first project is the gift jar (above).  I'm reusing a jar that I received as a Christmas gift last year.  When I received it, it was filled with peppermint hot chocolate mix.  That hot chocolate mix is long gone, so I've washed the jar and refilled it--this time, with hard candy.  I've dressed the jar up with papers and stickers from the "Peppermint" collection by Crate Paper.  Appropriate, no?  To make the label for the jar, I adhered a tag sticker to cardstock, then trimmed around the edges.  I spelled my message with the Peppermint alphabet stickers, but dotted my "i" with the little circle left over from the hole in the tag.  I reused gold elastic cord (saved from product packaging) to attach the tag to the jar, and I added a gold gel ink dot to the center of the dot on the "i."


Supplies: patterned paper (October Afternoon), cardstock (Bazzill), journaling cards (October Afternoon), pen (Zig), chipboard accents (October Afternoon), "Romance" alphabet stickers (Authentique), all other alphabet stickers (October Afternoon), bottle caps (Bottle Cap Inc.), rub-ons (October Afternoon), ink (Stewart Superior).

The next project I want to show you is a layout.  (ETA: This layout was published in the February, 2013 issue of Scrap n' Art e-zine.)  I challenged myself to create a non-Christmas layout featuring the colors red and green, and I came up with the page that you see above.  Here are a few detail photos...


My last project for today's post also uses October Afternoon products.  I created this card in response to a recent challenge on the OA blog.  The challenge was to create a project incorporating holiday song lyrics.  As with the layout above, I took the romantic route and created this card for my husband.  I mixed some old-ish "Good Cheer" papers with some new-ish "Sidewalks" papers and stickers, threw in three "Modern Homemaker" labels, and mixed and matched an assortment of alphabets.  I think that mixing together different alphabets is sort of my "thing" right now. 


So, there you have it--three projects influenced by the holiday season.  Thanks for stopping by to take a look at them.  Have a great day!

Monday, December 5, 2011

Shopping Our Stash: Greeting Cards Recycled as Page Elements

I love making friends from around the world.  I have crafting/blogging pals from many countries; I've been involved with various exchange student programs; and I've had international pen pals since I was a teenager.  Every December I enjoy receiving Christmas/holiday cards from my pen pals, and I'm always looking for ways to document these tokens of international friendship.

I recently discovered a weekly challenge site called "Shopping Our Stash."  It is all about using what you have on hand instead of buying more and more craft supplies.  Stash reduction is an eco-friendly concept that's right up my alley.  This week I'm playing along with "Shopping Our Stash" for the first time, taking their challenge to recycle a greeting card.  In fact, I'm using three greeting cards on a scrapbook page.  It's a photo-less page; I'm letting my pen pals' sweet holiday greetings speak for themselves. 

Supplies: green striped papers (Reminisce), notebook patterned paper with barcode "postmark" (Making Memories), snowflake alphabet stickers (Reminisce), mini alpha-numeric stickers (Authentique),  Earth sticker (Reminisce), label stickers (October Afternoon), pen (Zig).

Besides the greeting cards, I also included some other recycled page elements: bits of used wrapping paper and used postage stamps.  The postage stamps are not the ones that came with the cards--I just used any stamps that I thought would look pretty on the page.  I also finally used part of a sheet of Making Memories paper that I'd had in my stash for a couple of years, so I'm quite pleased with this exercise in "stash reduction."

Here are a few detail shots...

 cluster at the top of the page: 
wrapping paper scraps and used postage stamps


 another postage stamp cluster...heavy on the cuteness factor :)


still more postage stamps, 
plus my subtitle on the Planet Earth sticker


I am also entering this scrapbook page in the current Scrap for Help challenge.  For the month of December, Scrap for Help is challenging participants to create Christmas projects that incorporate recycled materials.  So, this page fits perfectly with the Scrap for Help challenge as well. 

I had a lot of fun playing along with these challenges, and I look forward to participating more with "Shopping Our Stash" and "Scrap for Help" in the future.