Sunday, April 29, 2012

Get Creative Card Challenge: Stripes

This is my second card for the Get Creative card challenge.  The first one was an animal-themed card with a motif of "spots."  The second one, which you see pictured below, is also an animal-themed card, but this time with a "stripes" motif.  I used a variety of border stickers to create the striped background.  In some cases, I was able to use up left over bits of border stickers which I had previously trimmed down for other projects.  So, making this card was a great way to "rescue" materials that otherwise might have been thrown away.

Supplies: patterned paper and alphabet stickers (Lily Bee Design), lion sticker and border stickers (Doodlebug Design), balloon sticker (Basic Grey), corner rounder (Creative Memories), twine (household natural twine).


I really put my stickers to use on this card, using the balloon and the lion to secure the twine in place.  It was so much easier than trying to apply a thin strip of glue to the twine.


I had so much fun mixing and matching the Lily Bee alphabet stickers.  I love that each sheet of Lily Bee stickers has complete alphabets in eight different colors.  Here I combined stickers from the Handmade, Double Dutch, Harvest Market, and Happily Lost product lines.


Additional supplies for inside of card: mini alphabet stickers from Bella Blvd.


The inside of my card also has stickers, which spell out the greeting "Happy Birthday."  I'll be sending this birthday card to a friend soon.  I hope she will like it!

Get Creative Card Challenge: Spots


Supplies: card base (Yours Truly for Archivers), yellow paper (American Crafts), green paper (3 Bugs in a Rug), kangaroo sticker (Doodlebug Design), banner stickers & mini alphabet stickers (Lily Bee Design), polka dot stickers (Bella Blvd), ink (Clearsnap), corner rounder (Creative Memories), twine (household natural twine).

This month one of the card challenges at Get Creative is to make a card using stickers.  I love stickers, so this challenge really appealed to me.  I ended up making not one but two cards.  Both feature animals, and one has a "spots" theme, while the other has a "stripes" theme.  The card in this post (pictured above) is the "spots" card; the "stripes" card is in a separate post.

I used green patterned paper that has a subtle, tone-on-tone polka dotted pattern.  To play up the polka dots, I randomly layered round, orange stickers over the green dots.  My idea for the dots was based on an idea from Helen Tilbury.  She used the dots from "i" and "j" stickers to make confetti.  I did that as well, but I took it one step further and used the circles from inside round letter/number stickers (for example, "a" and "6") to make the larger bits of confetti.


The orange circles on my card came from Bella Blvd alpha-numeric stickers.  When I use these stickers on layouts, I sometimes I include the inner circles, as you can see with the letters "d" and "a" on the old layout reposted above.


Other times, however, I do not use the inner circles, as with the letter "p," on the old layout reposted above.  Since I don't like to throw away unused supplies, I was happy to be able to use these left over circles on my kangaroo card.


The kangaroo and the confetti circles were not the only stickers that I used on this card.  I also used banner stickers and mini letter stickers to fashion my sentiment.


Additional supplies for inside of card: earth and sentiment stickers (Lily Bee Design), balloon sticker (Basic Grey), pen (Creative Memories).

I also used stickers to decorate the inside of the card, leaving white space at the top so that I could write a message.  I mailed this card to a friend last week.  I hope she will like it!

Wednesday, April 25, 2012

Free Cake (Lily Bee Sketch)


Supplies: patterned paper (Lily Bee Design), journaling card (Lily Bee Design), mini alpha-numeric stickers (Lily Bee Design), decorative stickers (Lily Bee Design), ink (Stewart Superior), glitter paint (Stickles by Ranger), pen (Zig), heart stencils (Cosmo Cricket), alphabet stencils (October Afternoon), twine (household natural twine).

The design of the above layout, "Free Cake," was inspired by Lily Bee Sketch Challenge #8.  I combined the sketch with Color Room palette #107 , which matches perfectly with the Lily Bee "Handmade" papers and stickers that I used.

The journaling on the layout reads: "A few days before the wedding, I won a free birthday cake from a local radio station.  After the ceremony, we went to our new apartment and shared cake with our parents."  If you are new to my blog, here is a little background on my wedding story: my husband and I were married in a private ceremony in April of 1998.  We had a reception with family and friends a few months later.  At the reception we served our guests a traditional tiered wedding cake (scrapbooked in this post), but after our little wedding ceremony we ate the "birthday" cake that you see in the layout above.

I made customized banner pieces and page accents by covering some older Lily Bee stickers with "Sand" paper from Lily Bee's Double Dutch line.


I further customized my page with a little inking...

...and a little distressing...

...and a LOT of red Stickles!


I used a stenciling technique to apply the Stickles to my layout.  I carefully removed the outside area from previously-used sticker shapes (for example, the hearts in the photo above).  I carefully stuck these "stencils" to my layout, then I used a paintbrush to fill in the shapes with Stickles.  Then I removed the "stencils" from my layout and waited for the Stickles to dry.


I had fun making pretty, customized embellishments (such as the one in the photo above) from the "throwaway" parts of half-used sticker sheets.  That's my kind of recycling!

Thanks for stopping by my blog today.  I hope you have enjoyed my layout and my stenciling mini-tutorial!


Sunday, April 22, 2012

Infinite Alphabet: October Afternoon

I used to have a love/hate relationship with alphabet stickers.  While I loved the fun fonts and colors, I hated the frustration of running out of common letters (S's, R's, T's, vowels, etc.) and being left with half a sheet of letters that don't spell anything (Q, Z, X...you know, all the same letters you dread getting in Scrabble).  It seemed like such a waste.

However, I recently realized that some manufacturers repeat font styles every few releases.  This makes it easy to combine stickers from different lines.  As long as you like to mix and match letter colors (a technique which I happen to LOVE), you can use alphabet stickers from newer lines to supplement your left over letter stickers from older lines.

Supplies: stickers (October Afternoon), cardstock (Wausau Paper), patterned paper (October Afternoon), photo collage software (Walgreens.com), die-cut spinner and arrow (October Afternoon), misc. (metallic brad from office supply store).

October Afternoon is my favorite manufacturer that repeats fonts every few releases.  On the layout above I combined stickers from the following lines: Sidewalks, Fly a Kite, Thrift Shop, Cherry Hill, and Road Map.  The playful mix of colors supports my theme of a young boy enjoying his spring break.

So nowadays, instead of saying that I have a love/hate relationship with alphabet stickers, I just say that I LOVE alphabet stickers!  Thanks for stopping by my blog to see my layout.  If you would like to see more projects with ideas for using letter stickers, you can click on over to this post on the October Afternoon blog.

Saturday, April 21, 2012

Spring Photography

The uncertain glory of an April day,
Which now shows all the beauty of the sun,
And by and by a cloud takes all away.
--William Shakespeare,
from The Two Gentlemen of Verona

William Shakespeare was a pretty smart guy.  He was absolutely right about April weather.

Last time I blogged, I wrote about lovely warm weather and spring tulips...then later that night we had a hail storm.  And then the next morning, we had snow flurries!  My poor tulips are wilted and crushed.  That's springtime in Minnesota for you.

Luckily, I know just the place to run to when the weather refuses to cooperate with my need for warmth and sunshine.  There's a lovely hothouse garden in Saint Paul, known as the Como Park Conservatory, which my husband and I visited recently on a date.  I got some great photos that day, and I thought I'd share some of them with you on my blog.  Here they are...

This room in the Conservatory is called the Sunken Garden.  The floral displays change seasonally.  Here is the spring display in all its glory!


Lovely, undamaged tulips--insert sigh of envy here.


Getting in touch with my inner Georgia O'Keeffe...


I've seen pink hydrangeas before, and I've seen blue hydrangeas, but this is the first time I've seen a mix of pink and blue on one hydrangea!


This flower was lovely in living color, but I converted it to black and white to emphasize its many gorgeous layers of petals.


Moving on from the Sunken Garden, the rest of the Conservatory has a great collection of tropical plants.  Ah, paradise!


I have no idea what this plant is called, but its color and shape are so eye-catching!


These yummy, sun-kissed oranges look like they should be in Florida or Italy, instead of Minnesota!


That's it for today!  I hope you've enjoyed your little tour of the Como Conservatory.

Sunday, April 15, 2012

Spring Tulip (Lily Bee Sketch)


Supplies: patterned paper (Lily Bee), mini alphabet stickers (Lily Bee), journaling card (Lily Bee), yellow alphabet stickers and orange asterisk stickers (Bella  Blvd), pen (Sakura Gelly Roll), ink (Versa Mark), orange acrylic paint (Plaid Enterprises), green acrylic paint (Deco Art), standard office hole punch.

Spring is in the air!  Cherry and apple trees are flowering, birds are singing, and tulips are in bloom.  With all that springtime imagery surrounding me, it's no wonder that I scrapbooked a spring photo when I joined in the current Lily Bee sketch challenge.


The journaling (pictured above) on my layout reads: "We have quite a few tulips in the front yard, but for some reason only one in the back yard.  It adds a happy splash of color."

Even though this is a fairly simple, single-photo layout, I managed to use quite a few Lily Bee products.

* the yellow floral paper is "Pattern Block," from the Handmade line
* the brown graph paper is "Sand," from the Double Dutch line
* the teal dotted paper is "Harvest Blue," from the Harvest Market line
* the orange dotted paper is "Villa," from the Happily Lost line
* the mini alphas are from the Handmade line
* the journaling card is from the Double Dutch line


I made up my own pattern for the tulip paper-piecing (shown above), and I had fun enhancing my layout with paint.


I used some tiny punched circles and more dabs of paint to make a playful border (shown above).

Thanks for stopping by to check out my layout.  You can see what other bloggers did with this sketch on the Lily Bee blog.


Wednesday, April 4, 2012

Authentique Sketch Challenge


Supplies: All papers and stickers are from Authentique.  The corner rounder is from Creative Memories, the pen is from Zig, the ink is from Autumn Leaves/Stampology, and the bottle cap is from Bottle Cap Inc.

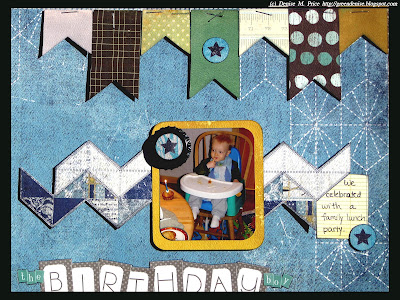
The warm smell of banana cupcakes in the oven...the bright sunshine on an otherwise cold February day...the babbling of my little boy's voice...I can still remember this day so clearly.  It was my son's first birthday, and we had a little party for him with his grandparents, aunts, and uncles.  To capture the memories of this special day, I created the above layout, entitled "The Birthday Boy," using a sketch (seen below) from the Authentique Paper blog.


I love sketches with banners!  I chose a denim patterned paper from Authentique's "Genuine" collection as the base of my layout, because the faux stitching along the top and in the upper right corner highlighted the banner.  I trimmed scraps from various Authentique papers (a great way to use up lots of scraps!) to create each of the individual flags in the banner.  I used a regular stapler to attach the flags in creative ways (see photo below).


The zig-zag/chevron fussy-cut paper is also from the "Genuine" collection, and the fussy-cut star-circles are from the "Celebrate" collection.  I used large alphabet stickers from the "Delightful" collection and small alphabet stickers from the "Gathering" collection to spell out my title.  The photo mat and journaling block are both trimmed from "Free Bird" papers.  Below is a closeup of the journaling.


Even though I combined supplies from many different Authentique collections, I feel like all the supplies fit together really well.  And now I have a special page to house a precious photo.  Thanks for visiting my blog to see "The Birthday Boy"!


Scrap Africa Sketch #3

ETA: I was a winner!  Thanks to everyone who voted for my layout.


Supplies: floral patterned paper (October Afternoon), all other patterned paper (My Mind's Eye), numeral stickers (Bella Blvd), navy blue alphabet stickers (Basic Grey), orange alphabet stickers (Bella Blvd), butterfly die-cuts (Dufex), mini alphabet stickers (Bella Blvd), corner punch (Creative Memories), ink (Versa Color), ribbon (October Afternoon), household items (twig, emery board for distressing photo edges).

Spring is a lighthearted time of year...and today I have a lighthearted page to share with you.  I used a sketch from the Scrap Africa blog to create this layout (above) called "Have Dinosaurs, Will Travel."  The photo shows my son, out for a walk with a rucksack full of plastic toy dinosaurs.


The twig (pictured above) that I used is an actual twig, which I found on the sidewalk.  Before adding it to the layout, I pressed it under a heavy book for a few days in order to flatten it.

All the mini 6x6" papers are from the "Follow Your Heart" collection by My Mind's Eye.  I put together four of these papers to divide my page into quadrants.  I also fussy-cut some of the honeycomb prints to make accent pieces to frame my photo.  The Follow Your Heart papers had such sweet phrases printed on them, I felt like they took the place of journaling.  So, I'll close with four detail shots of the printed phrases.  Thanks for looking!