Friday, August 30, 2013

Lily Bee 8/6 Sketch Challenge

The other day I was looking at the papers from my Lily Bee Pinwheel collection, and I noticed an orange dotted paper next to an orange herringbone paper.  The two orange patterns looked so striking next to each other, I knew I wanted to use them together in a layout.  The page below, entitled "Details," is the result of that desire to pair orange with even more orange.  I also added some pops of blue for contrast, and to match my son's blue shirt.

Supplies: all paper & stickers by Lily Bee; pen by Zig.

I used the sketch below, which is the Lily Bee August challenge sketch.


I like to put a lot of journaling on my pages, and sometimes I struggle to find room for it.  So, I was happy to see a big stretch of white space on this sketch.  I used that space for my journaling.


The journaling (which is easier to read in real life than it is in the photo) says: "It's amazing how the simplest things can be the most fun!  This Children's Museum exhibit was made up of just magnets, washers, and nuts.  We played with it about twenty minutes, and we would have played longer if we'd had the opportunity.  We made towers, bridges, tunnels, etc.  It was so fun seeing how much we could stick together before the magnets gave way.  Maybe I should get this stuff for our house.  :)"  It probably wouldn't be as fun, though, if we could play with magnets and hardware everyday.  The novelty of this exhibit is what made it really fun.  Still, it could be a good rainy day activity to do at home...


I followed the sketch pretty loyally except for the four big circles.  I already had a lot of circles on my page, what with the polka dotted paper and the washers and nuts in the photos.  Adding even more circles would have overwhelmed the page.  So, I replaced the row of circles with a row of photos, which carries about the same visual weight.


It was fun putting together little elements to make embellishment clusters.  Everything on this page, with the exception of my pen, is from the Lily Bee Pinwheel collection.  Thanks for stopping by my blog today to check this page out!

Wednesday, August 28, 2013

Guest Designer @ Child's Play Challenges

Hello, all!  I often describe my scrapbook style as "playful," so I'm pleased as punch to be guest designing for Child's Play Challenges this month.  I designed a page for their "Uno" challenge.  Since the game cards in Uno are red, blue, green, and gold, those are the colors I chose for my page.  I converted my photos to sepia, so that they would not compete with the "Uno colors."

Supplies: background paper from My Mind's Eye; starry paper from Bo Bunny; flashcards, rub-ons, large alphabet stickers, & round alphabet stickers from October Afternoon; black alphabet stickers from Doodlebug Design; ribbons from Scrapbook Fantasies; pens from Zig.

Our family does not have "classic" Uno, but we do have a Star Trek Uno set.  Therefore, I used a lot of outer space imagery in my layout.  I also used a lot of snowflake imagery, since our family mostly plays card games in the winter, when it's cold outside.


I had fun making my own Uno embellishments for this page.  I placed a selection of six cards on my table, photographed them all together (see below), and had the photo printed. 


I then cut out the cards from the photo and layered in them in a row below my the photo cluster on my layout.  They turned out very realistic-looking...so much so that my son, when he saw them, tried to get me to play an actual Uno game with him, using these miniature cards.  The game doesn't last very long when you only have six cards, though, as he soon discovered.  :)


Have I inspired you to play along with the Uno challenge?  You have until the end of the month to link up at Child's Play Challenges.

Monday, August 26, 2013

A Tea Time Feature & a Cookie Recipe

ETA: Funny how most blog comments seem to arrive while I am sleeping.  :)  Thanks for all your interest in the recipe.  You can substitute peanut butter for the almond butter.  I know a stick of butter is about 110 grams.  As far as other metric conversions go, I'll have to check on them and get back to you later.  Or you could try using an online recipe converter.  Enjoy the cookies, if you make them.


Hello, I'm glad you could pop by my blog for "tea time" today!  I have exciting news--my "Donuts" layout was featured on the Needle~Thread~Cloth blog.


The challenge there was to combine the embroidery stitch called "stem stitch" with a tea-themed project.  This was actually my first time doing stem stitch!  I guess I used to think of it solely as the stitch that people use on those pre-printed embroidery designs for tea towels.  I never considered using it for scrapbooking.  But I found out that it works a charm for embroidering curved lines, such as the outline of my heart tag, pictured above.  
 
Here is the entire layout.  For details on its creation, see this post.

It did take me a few tries to get the stitching right.  When I'm using a back stitch or running stitch on paper, I punch all the holes first, then draw the thread through the holes.  This did not work with the stem stitch; I kept getting the spacing wrong.  Three ruined tags later, I realized that I'd have to work it the same way I would on fabric, one stitch at a time.  Now that I know what I'm doing, LOL, I'll be using stem stitch on paper a lot more often in the future!


A few weeks ago, I got a request for my No-Bake cookie recipe (cookies pictured above).  I thought I'd close this post by sharing that recipe.

In a mixing bowl, cream together 1 STICK BUTTER, 4 TABLESPOONS COCOA POWDER, 1 TABLESPOON VANILLA, 2 CUPS SUGAR, & 1 CUP ALMOND BUTTER.  Add 3 CUPS OATS to the creamed mixture.  Chill batter in fridge for about 2 hours.  Place parchment over two cookie sheets.  Form chilled dough into balls (about the size of truffles).  Place balls of dough on cookie sheets, then chill again in refrigerator.  When cookies are firm and hold their shape (after about one more hour in the fridge), transfer cookies to a covered container.  Keep cookies chilled until ready to eat.  Makes 50 cookies.

These little balls of sugary goodness are very rich, almost more like candy than cookies.  If you use gluten free oats, then the cookies will be gluten free.  Bon appétit!

Saturday, August 24, 2013

Thinking Deep and Beautiful Thoughts (SiP, SA & B71B)


Supplies: green cardstock from Wausau Paper; light blue & medium blue cardstock from Bazzill; burlap from Canvas Corp.; patterned paper from Bo Bunny; ribbon from Scrapbook Fantasies; buttons from Blumenthal Lansing; thread from Singer; alphabet stickers from October Afternoon; label sticker from Lily Bee; pen from Zig; felt scraps from my stash.


We all change and grow as time passes.  I think that even my scrapbooking style has changed recently!  It used to be difficult for me to combine challenges.  However, I now seem to do it frequently.  The layout you see above, which is called "Conservatory," fits three challenges--Scrapbooker's Paradise, Scrap Africa, and Berry 71 Bleu.


For the page design I used the above sketch from the Scrapbooker's Paradise Blog.


As far as the color scheme goes, I used the combination of blue, green, & white (inspiration image shown above) from Scrap Africa challenge #20.  It was also a requirement at Scrap Africa to use at least two photos.  Did you spot my two?  I used a cropped 4x6" photo of my son at the Conservatory, and I layered it on top of an uncropped 5x7" shot of some flowers at the Conservatory.  Layering photos in this manner is a fun alternative to placing them side by side.


Last but not least, I was inspired again by the August Berry 71 Bleu challenge, which is to create page texture using textiles.  As the close-up shots below demonstrate, I used handmade felt pinwheels, tattered burlap, and a web-like ribbon on my page.


Hope you've enjoyed this texture-filled layout.  It was fun to make  such a summery page.  We are now on the cusp of autumn here in Minnesota, and I'll miss summer!

Thursday, August 15, 2013

Donuts, Tea, Stitching, & Fabric


ETA--this layout was featured on the Needle~Thread~Cloth blog!
 
Supplies: background cardstock from The Paper Company; assorted kraft cardstock scraps from Neenah Paper; cream cardstock from Pulp; all patterned paper from Crate; doily from Royal; Distress Stain & marker from Ranger; all thread from DMC; lavender & garnet inkpads from Clearsnap; gold inkpad from Tsukineko; aida cloth from Charles Craft; heart tag & canvas strips from Canvas Corp.; bee tag from Basic Grey; alphabet stickers from October Afternoon; tulle from Wyla; felt, lace, & garnet ribbon from my stash; all gold trim from  Scrapbook Fantasies; ribbon rosette from Berwick Offray; mouse stamp from PSX; flower stamp from Leavenworth Jackson; journaling pens from Zig.

Hello, everyone!  I had two little pieces of tea-dyed fabric left over from my "Medicine Garden" layout, so I used them to create a scrapbook page called "Donuts."


"Donuts" uses the Color Room palette #156 (shown above), a combination of light pink, light lavender, gold, and garnet.  I am also entering this layout in the Needle~Thread~Cloth August challenge, where the prompt is to use stem stitch and something related to tea.  Furthermore, I'm also entering "Donuts" in Berry71Bleu's August challenge, where the prompt is to use textiles to create texture.  Let me show you a few detail shots of my layout, so that you can see how I have incorporated all these prompts: textiles, stem stitch, and tea...


I began my layout by constructing a a collage as the background.  Collage is always a nice way to use up leftover paper scraps.  I also used a white Distress Marker to trace around a paper doily scrap to add interest to the collage.


Paper alone would be a bit monotonous in a collage, so I also glued down strips of pink and lavender tulle.


Using a garnet inkpad and a bit of unfinished macramé that I'd lost interest in, I stamped around the edges of my collage for a bit of texture.


I added more texture by stamping with a scrap of aida fabric (cross stitch canvas) and gold ink.


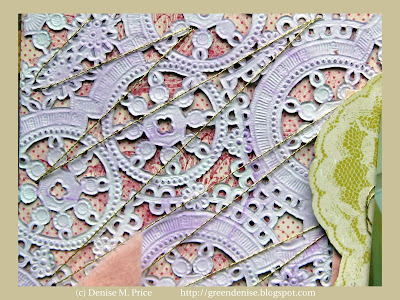
With my background complete, it was time to assemble the foreground.  I anchored my photos in the upper left hand corner with a quarter of a paper doily (the same one that I traced around earlier with a white pen).  This doily was lightly rubbed with lavender ink and loosely stitched to stamped patterned paper using gold thread.


I added layers below both of my photos.  In addition to paper layers, I also added ribbons, thread, and even the outer wrapper from a tea bag!


I also added reproduction sewing pattern pieces, plus lace that was lightly rubbed with Distress Stain.  I think that layering these small bits and bobs beneath the photos adds depth and character to the page.


Above you see the canvas strips, which were dyed with blackberry tea.  The lower strip also has some splashes of Distress Stain on it.   A tea bag hang-tag, swiped with lavender ink, dangles above these canvas strips.


For my title, I recolored a pre-made heart tag with Distress Stain, embroidered around the edge, and added a bit more aida cloth stamping.


This title tag is where I did the required stem stitching.  This was my first time doing stem stitch, and it took three tags before I got it right.  (Good thing I bought a multi-pack of those text-print heart tags!  They are from Canvas Corp.)


I used gold trim to embellish both the title tag and the "be happy" tag.  These gold trims are from a pre-coordinated pack from Scrapbook Fantasies.


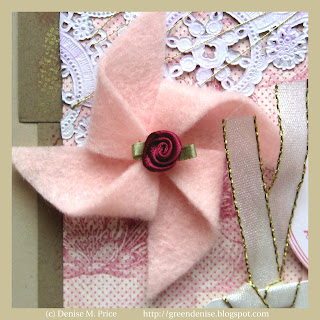
As a final touch, I sewed a felt pinwheel embellishment and tacked a ribbon rosette to its center.


Now, if you have been wondering why my husband is pictured with juice, instead of a donut, on this page, the journaling will explain the reason.  It has to do with Scott's gluten allergy.  The journaling reads: "Any date with Scott is wonderful, but this trip to the donut café was especially meaningful.  He can't eat donuts, but he knows how much I love them, so he took me to the café anyway.  I would do the same type of thing for him."  I don't have any serious food allergies, but I have been known to accompany my husband on shopping trips to the hardware store, simply because he enjoys it so much (even thought it's not really my thing).  

Thanks for visiting my blog today.  I hope that my layout, with all its textiles and tea-references (not to mention its somewhat lovey-dovey journaling), gave you a warm, fuzzy feeling.  :)

Saturday, August 10, 2013

A Cup of Christmas Tea (10 on the 10th)

Hey, y'all!  Today is August 10, so it's time for the next installment of my "10 on the 10th" destashing series.  This month I'll be showing you ten projects that I made with my file of "winter" products.  Why winter projects in the middle of summer?  New winter-themed scrapbook products are about to hit store shelves, so I thought I'd clear out my old stash before I consider buying more.  :)


I'll be leaving this post at the top of my blog at least through Tuesday, August 13, because I also intend to link it to Elizabeth and Bleubeard's T Tuesday post.  Above you can see my tea cup, filled with red hibiscus tea, served with no-bake cookies (Yum!), and surrounded by some of the winter-themed cards that I'll be showing you in this post.  You might want to grab a cup of tea too, because, like all of my "10 on the 10th" posts, this is going to be a long one.  Here we go!

Project 1 (outside) supplies: card base paper & "Fa la la la la" strip from Cosmo Cricket; fussy-cut ornament paper from Crate; remaining papers from Bo Bunny; doilies from Royal; thread from DMC; ink from Tsukineko; upcycled slide frame.

I am still really into using my old slide frames.  I love the retro feel that they embody.

Project 1 (inside) additional supplies: dotted paper by October Afternoon; journaling card by Crate; ink by Hero Arts.

Speaking of retro, check out that groovy ornament print on the inside of the card!  It would be hard to write on, so I added a block of lined paper. 

Project 2: cardstock from Neenah Paper; brown patterned paper from Bo Bunny; vintage images from Graphic 45; sentiment sticker from Simple Stories; pom-pom trim & gold cord from Scrapbook Fantasies; paints by Ranger; confetti from Pipoos (thanks to my Dutch friend Tamara!); all wet media from Ranger; upcycled slide frames; ribbon from an old bouquet.

I used even more of those slide frames on my second card, this time painting them for an ombre effect.  This card has a plain kraft interior.

Project 3: alphabet stickers from October Afternoon; paper & all other stickers from Reminisce; ribbon from Berwick-Offray.

Next I had some cute "Frosted" products from Reminisce to use.  I cut a sheet of argyle/striped paper into three sections and made three cards.  The flat/mailable card above has an interior with horizontal stripes, a perfect writing surface.

Project 4 (outside): music score paper & alphabet stickers from October Afternoon; blue dotted/snowflake paper & negative curlicue sticker from Bo Bunny; all other paper & stickers from Reminisce; Stickles from Ranger.

My snowman card is also of the flat/mailable variety.  For a sparkly border, I used a sticker negative as a stencil and applied icy-blue Stickles (see detail shot below).


I added a journaling spot inside this card.

Project 4 (inside): tone-on-tone chevron paper from Crate.

My final Reminisce card breaks the mold, for it is not flat at all!

Project 5 (outside): word stickers & word paper from Crate; candy cane sticker from Basic Grey; all other stickers from Bella Blvd; ruler paper from Authentique; striped & argyle paper from Reminisce; all other paper from Bo Bunny; bow from Berwick-Offray.

This card also had a journaling/writing spot on the inside.

Project 5 (inside) additional supply: journaling card from Crate.

I had a few leftover supplies from the cards I had made so far, and they came together perfectly to make this mini card (about the size of an ATC).  I had fun using a white pen to create free-hand doodles around the polar bear.  This card has a plain kraft interior.

Project 6: kraft cardstock from Neenah Paper; patterned paper from Bo Bunny; sentiment sticker from Crate; polar bear sticker from Reminisce; Picket Fence pen from Ranger.

Next, I wanted to make a flat/mailable card with an artsy vibe.  With that idea in mind, I created the card below, which is my attempt to give the impression of snow, ice, and holiday joy.
 
Project 7: card base paper from Magnolia; tape from 3M/Scotch; sticker negatives from Reminisce; ink from Clearsnap; all other wet media from Ranger; corner punch from Creative Memories.

I did more stenciling with Stickles on this card.  The negative snowflake stickers may appear familiar, because they are left over from making Project 4!  Here is a detail shot.

This card has a plain white cardstock interior.

Moving on, I also needed to make some birthday cards this month.  For my next two cards, I used some "ancient" Bo Bunny calendar square stickers. 
 
Project 8: cardstock from American Crafts; sticker from Bo Bunny; paint from Ranger; chalks from Stampin' Up; corner punch from Creative Memories; ribbon upcycled from an old bouquet.

I made "male" and "female" versions, using the same card design.  Both cards have plain white interiors.
 
Project 9: cardstock from American Crafts; sticker from Bo Bunny; paint from Ranger; chalks from Stampin' Up; corner punch from Creative Memories; tulle ribbon from Wyla.

These male/female cards remind me of birthday cupcakes; the string printing looks like mounds of frosting, and the chalk dots look like sprinkles.
 
Project 10: previously posted here.

My tenth and last project is one that has already appeared on my blog.  It uses Crate Christmas alphabet stickers, Bo Bunny Christmas bracket/photo corner stickers, and Basic Grey & Bella Blvd Christmas sticker negatives...even though it is not a Christmas layout.  It's fun getting creative with old supplies and using them in new ways.  I hope that you have enjoyed seeing my ten projects.  Thanks for sticking with me through this long post!  :)